Tuesday, February 10, 2015

DIY Thing One & Thing Two Valentine's Day Lollipops


Last year we baked cupcakes for Benny’s day care buddies to celebrate Valentine’s Day.
This year, we’re keepings things a bit simpler with Dr. Seuss themed Valentine’s Day Cards and small cherry lollipops.
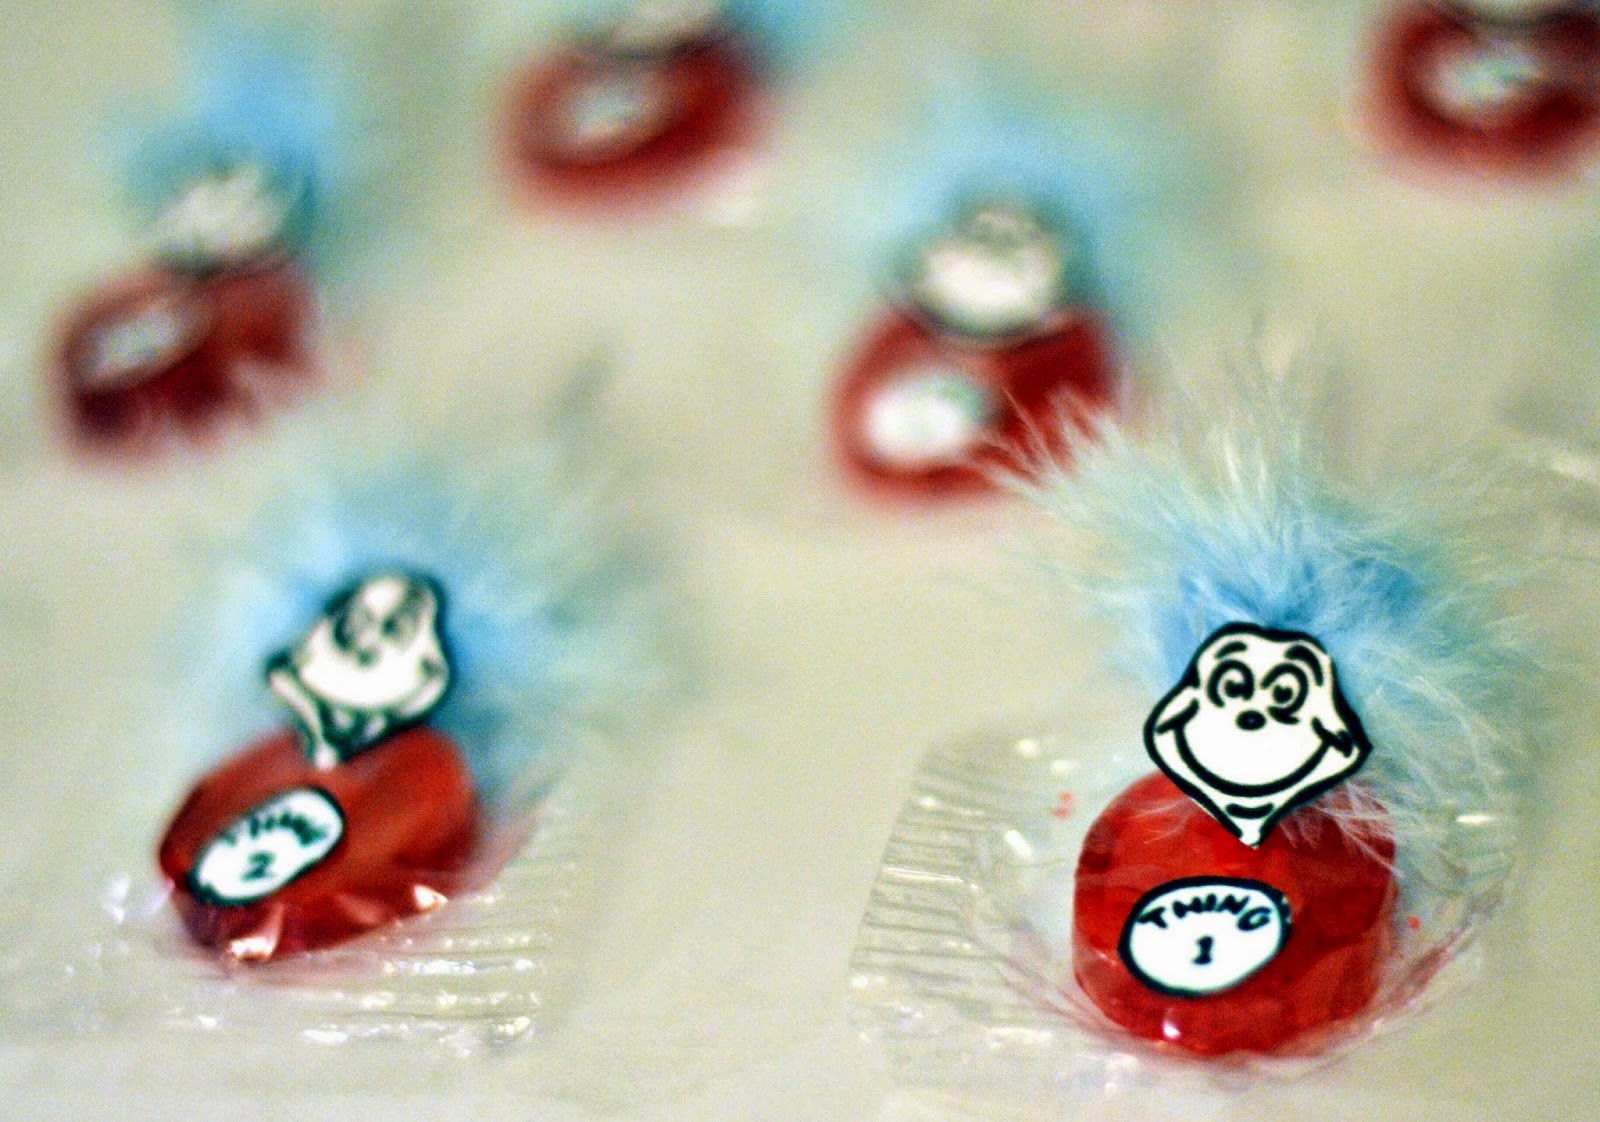
The lollipops, however will be dressed as the famous Cat in The Hat characters, Thing 1 and Thing 2.
The idea came about when I found a teal colored faux marabou boa inside my scrapbook locker…ha! There’s nothing tricky about this project, except the cutting of small shapes and gluing of the boa so that it truly looks like the characters’ hair.
It’s just a simple way of dressing up the V-Day cards and keeping things matchy-matchy with the Dr. Seuss Theme.
Only a few more days till Valentine’s Day!

Materials:
*Small red lollipops
*Thing One and Thing Two Black & White Printouts
*Teal/Light Blue Marabou Boa Scissors
*Glue gun

Instructions: Start by cutting about half-inch sections from the boa. Hold the small feathers together with your fingers and attach them with hot glue to the lollipop sticks (which should be turned upside down). (Tip: You should finish gluing the blue “hair” to all the lollipops before going to the next step because it will serve as a ‘base’ from which to decide where the character faces should be centered). Next, you carefully cut out the character faces from the paper printouts as well as the “Thing 1/Thing 2” labels on the characters’ tummies. Finally, you glue the faces over the marabou boa and the “thing” labels on the center of the lollipops. All done!




En español

El año pasado horneamos “cupcakes” para regalar a los amiguitos de la guardería de Benny el día de San Valentín. Este año, haremos las cosas un poco más sencillas con tarjetitas de los personajes del autor de libros infantiles, Dr. Seuss y pequeñas paletas de cereza. Las paletas, sin embargo, las vestiremos como los famosos personajes llamados “Thing 1” y “Thing 2” del libro El Gato y el Sombrero (Cat in the Hat). La idea surgió cuando me encontré una boa de marabú color azul dentro de mi locker de manualidades... ja!
La verdad no hay nada complicado de este proyecto, salvo el corte de figuras pequeñas y la tarea de pegar la boa de manera que realmente se parezca al pelo azul de los personajes.
Es una forma sencilla de vestir las tarjetitas y de combinar el dulce con los personajes de Dr. Seuss.

Sólo unos días más para el día de San Valentín!

Materiales:
*Paletas rojas pequeñas
*Copias en blanco y negro de los Personajes “Thing 1” y “Thing 2”
*Boa de marabú color azul
*Tijeras
*Pistola de pegamento

Instrucciones:
Comience por cortar secciones de media pulgada de la boa. Mantenga las plumas sujetadas con los dedos y colóquelas con pegamento caliente en los palitos de la paleta (que deben voltearse al revés). (Consejo: Terminen de pegar el "pelo" azul en todas las paletas antes de proceder al siguiente paso, ya que servirá como "base" para decidir dónde pegar las caritas de los personajes) .
A continuación, se cortan con cuidado las caras de los personajes impresas en papel, así como los títulos que le dan a los personajes sus nombres "Thing 1 / Thing 2 " colocados en las pancitas de los personajes.
Por último, se pegan las caras sobre la boa de marabú y las etiquetas del nombre “Thing 1/Thing 2” en el centro de las paletas. Y listo!

Wednesday, February 4, 2015

Nurture your Closeness and Passion this Valentine's Day with a DIY Lover's Frame!

This shop has been compensated by Collective Bias, Inc. and its advertiser. All opinions are mine alone. #LoveOurVDay #CollectiveBias


This year my husband Paul and I will officially survive the "7-year itch"...hehe.
Our marriage is actually rather great, considering all of life's ups and downs but we've had our share of marital challenges with a few health scares, several relocations, stressful jobs and a child. Nevertheless, this summer will mark our 8th wedding anniversary, which means we're exiting the copper year and entering our bronze celebration (yes, we celebrate every wedding anniversary with the assigned gift). It also means, we want to start thinking about baby #2 before we keep getting older!
Anyway, for Valentine's Day, we'll be taking a few days for a much anticipated weekend getaway.
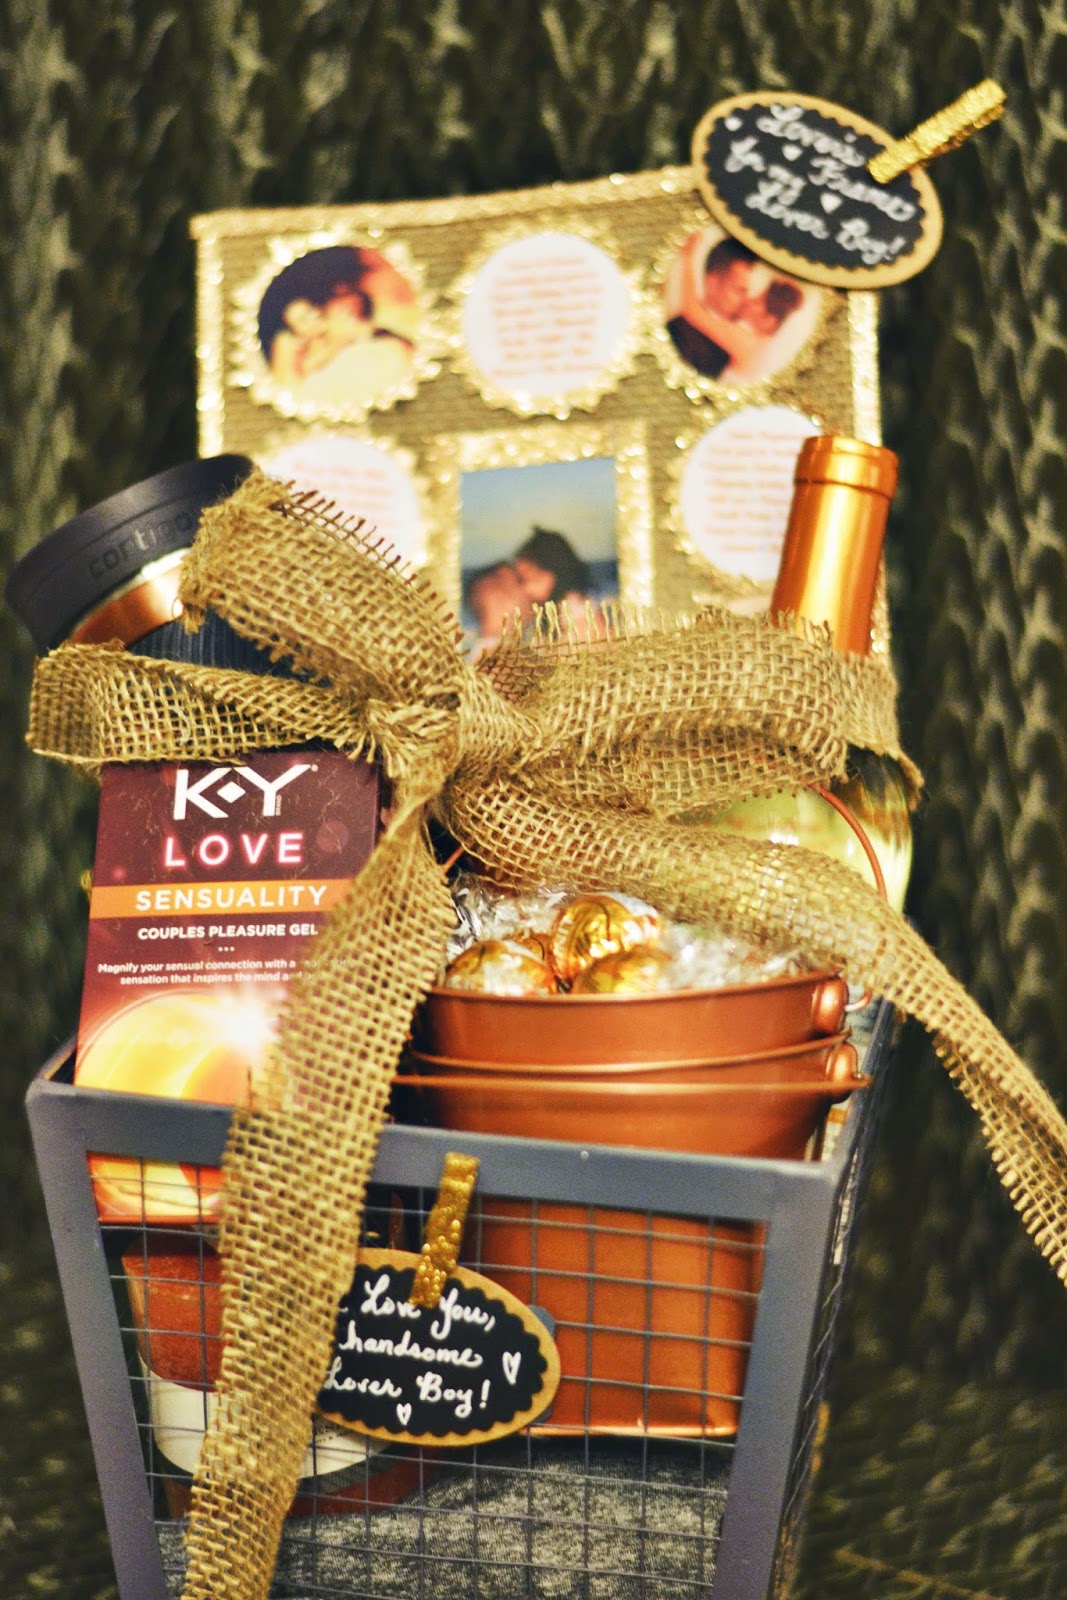
I wanted to surprise Paul with a manly-but-cute gift basket full of stuff we can both enjoy. So where did I go? Target, of course! I purchased several copper and bronze colored gifts (symbolic to both our outgoing and incoming wedding anniversaries), including a workout shirt, a coffee mug, wine, chocolates and K-Y® Love, sold exclusive at Target for Valentine's Day. By the way, there is a K-Y® Love 10% off Cartwheel offer going on through February 14. Get it here.
Then I shopped for materials to make a fun & passionate "Lover's Frame". The lover's frame basically was made up of romantic pictures of Paul and I followed by one-liner memories of things that only he and I would know about. I guarantee making one of these will serve as therapy and put a smile to your face in thinking of all the great moments you've shared with your sweetheart!


In order to make this Lover's Frame, here's what you'll need (keep in mind I purchased supplies at Target):
*Front loading 8x10" photo frame
*Tape
*Glue
*Scissors
*Burlap Roll
*Glitter paper
*Circle hand puncher
*Kraft Chalk labels & glitter clothespins for embellishing


The Target Exclusive  K-Y® Love can be found in the feminine products aisle

To make the gift basket similar to the one I made, here's what you'll need:
*Wire Storage Basket
*Mini copper buckets
*Chocolate with copper colored wrap
*White wine with bronze colored bottleneck
*Bronze-colored coffee travel mug
*K-Y® Love Sensuality Gel

In putting together Paul's basket, I arranged everything to have a the bronze and copper tones stand out. I figured the K-Y® Love Sensuality gel should be placed at the front of the basket to set the mood for our Valentine's Weekend and Eighth Anniversary Year!
Target also carries K-Y® Love Passion for your consideration ;-)

Hope everyone enjoys Valentine's Day!
How will you be celebrating with your loved one?

First, I wrapped the frame board with burlap and taped the back.

Then, I used glitter paper to cut thin strips and glue them on the edges of the burlap frame. I used the circle hand punch to cut out three - 2" circles. Then I decided to carefully cut an outline of tiny sun rays around the circles (The sun is symbolic to the summer which was the time of year we got engaged and married).


Next, I placed the circle sun designs around the main photograph, which also has a glitter border. I did this in order to measure and make sure they all fit perfectly inside the 8x10" space.

Next I printed romantic pictures and typed out several one-liners like "Tears in Cancun" and "Flashlight in Yosemite"-- both references to personal memories we have (In Cancun I was overwhelmed by the majestic pyramids and started bawling! Then during a trip to Yosemite, halfway through an evening hike, Paul realized he'd forgotten our flashlights!!...LOL)

 I carefully cut out the wording and the pictures and glued them to the sun borders. Then I glued everything to the burlap background.

My Lover's Frame!

En español

Este año mi esposo Paul y yo oficialmente habremos sobrevivido el “seven year itch” (referencia a siete años de matrimonio cuando se supone que ambos conyugues ya no se soportan y comienzan a pensar por separado).

Nuestro matrimonio es en realidad algo lindo, especialmente tomando en cuenta todos los altibajos de la vida. Hemos tenido un buen de desafíos matrimoniales con algunos sustos de salud, varios traslados, trabajos estresantes y un hijo. Sin embargo, este verano marcará nuestro octavo aniversario de boda, lo que significa que estamos saliendo del año de cobre e ingresando a nuestra celebración de bronce (sí, celebramos cada aniversario de boda con el regalo asignado). También significa que queremos comenzar a planear el bebé # 2 antes de que sigamos envejeciendo!

No obstante, para el Día de San Valentín, vamos a tomar unos días para una muy anticipada escapada de fin de semana.

Quería sorprender a Paul con una canasta de regalos varonil pero linda, llena de cosas para disfrutar los dos. Así que ¿a dónde creen que fui de compras? A Target, por supuesto! Compré varios regalos de tonos cobre y bronce (simbólico de nuestros aniversarios de boda salientes y entrantes), incluyendo una camisa de entrenamiento, una taza de café, vino, chocolates y KY® Love, de venta exclusivamente en las tiendas Target para el Día de San Valentín (La puedes encontrar en el pasillo de cuidado femenino). Por cierto, hay una oferta tipo ‘Cartweheel’ de 10% de descuento en este producto de intimidad. Consigue el cupón aquí.

Luego hice compras de materiales para hacer un divertido y apasionado "Marco de los Enamorados". El marco de los enamorados o amantes, básicamente se compone de imágenes románticas de la pareja, seguidas por recuerdos escritos en una sola línea sobre cosas que sólo él y yo sabríamos. Te garantizo que al hacer uno de éstos te servirá como terapia y el solo recuerdo de todos los gratos momentos que has compartido con tu amor te pondrá una sonrisa en la cara!

Para hacer tu propio marco de enamorados, aquí está lo que necesitarás (ten en cuenta que compré casi todo en Target):

* Marco de fotos, tipo carga frontal de 8x10 "
* Cinta Adhesiva
* Pegamento
* Tijeras
* Rollo de Arpillera
* Papel Brillo
* Cortador de círculos
* Etiquetas Kraft y pinzas de ropa de brillo para decoración

Para hacer una canasta de regalo similar a la mia, esto es lo que se necesita:

* Canasta gris de alambre de almacenaje
* Mini cubetitas de cobre
* Chocolates con envoltura de color cobre
* Vino blanco con cuello de botella de color bronze
* Taza de café, color bronce
* ‘K-Y® Love Sensuality’ Gel para la intimidad

En la elaboración de la canasta de Paul, organicé de tal manera para que todo aparentara ser de tonos bronce y cobre. Pensé que el gel K-Y® Love Sensuality debería colocarse en la parte delantera de la canasta para crear el ambiente de nuestro fin de semana de San Valentín y el Octavo Aniversario!

También hay KY® Love Passion para su consideración ;-)

Espero que todos disfruten del Día de San Valentín! ¿Cómo van a estar celebrando con sus seres queridos?

Saturday, January 31, 2015

Dr. Seuss Themed-Breakfast -- Benny's Valentine's Day Seussprise!!


Valentine's Day is two weeks away!
In order to make Valentine's Day festive yet boyish for my two-year old Benny, I thought about surprising him with a Dr. Seuss-Themed breakfast, with the Cat in the Hat as the highlight of the meal.
This year, we're giving his day care buddies Dr. Seuss-themed Valentine's Day cards, which pretty much served as the source of inspiration for Benny's breakfast treat.
We called it "Benny's Valentine's Day Seussprise"... LOL. funny, right?
I cut some red and teal streamers (the Cat in the Hat book colors) and made small whimsical labels and breakfast snacks, including green (deviled) eggs & ham.
Days before the breakfast, I made a hat and bowtie for Benny to match the Cat in the Hat, except the bowtie had a heart in the center!!
Benny was so excited about his breakfast buffet that he agreed to wear the Cat hat for a few minutes!
His favorite item was the stack of red and blue pancakes (of course) and his blue yogurt smoothie.
Prep time for this was about 2 hours due to the cutting, prepping and styling of food and trinkets.
It was a silly little fun idea to share the spirit of Valentine's Day with our little Benny, especially since we'll be leaving him behind on Valentine's Weekend for some very necessary alone time!
How else is everyone celebrating V-Day with their little ones?
Thanks for reading!


 En español

Con el fin de hacer la celebración del día de San Valentín divertido pero varonil y festivo para mi hijo Benny de dos años, pensé en sorprenderlo con un desayuno de Dr. Seuss, el famoso autor de libros infantiles que escribió “El Gato y el Sombrero”, libro que sirvió como el detalle culminante de este desayuno.
Este año, regalaremos a los amiguitos de la guardería tarjetitas del Dia de los Enamorados con los personajes de los libros de Dr. Seuss, y por eso me sentí inspirada para el desayuno de Benny.
Lo llamamos el "Desayuno Seusspresa para Benny del Día de San Valentín"... cómico, ¿no?
Primero corté tiras de color rojo y verde azul para colgar de fondo e hice pequeños sellos para los aperitivos y el desayuno, que incluyó huevos verdes y jamón (referencia a otro libro del autor).
Antes del desayuno, me puse a hacerle a mi hijo un sombrero y corbatín que coincidiera con los del gato y el sombrero, excepto que le puse un corazón en el centro al corbatín!
Benny estaba tan entusiasmado con su desayuno que no se opuso a ponerse el sombrero que le hice!
Su comida favorita fue los panqueques (por supuesto) de color rojo y azul y su yogurt azul.
El tiempo de preparación para este desayuno fue de aproximadamente dos horas.
Fue una idea chistosa pero se nos ocurrió hacerlo para compartir el espíritu del Día de San Valentín con nuestro pequeño Benny, sobre todo porque lo vamos a extrañar el fin de semana del 14 de febrero para darnos un tiempo a solas muy anticipado!
¿Cómo celebrarán el día del amor y la amistad con sus niños ?
¡Gracias por leer!