Tuesday, May 10, 2016

A "Berry" Yummy Backyard Fruit Bar!

This shop has been compensated by Collective Bias, Inc. and its advertiser. All opinions are mine alone. #SienteGlade #CollectiveBias
With spring in full bloom, I love to hang out in my backyard in the evenings and enjoy the weather, the plants and the comfort of being at home!
If you’ve been reading my blog, you know I love to create crafty things and my family is pretty big on celebrations: we love holidays, birthdays, special occasions and seasons!
This spring has been particularly special because our family has grown and I’ve spent a lot of time at home! I changed several decorative items around the house and bought the new Glade® Radiant Berries™ Candles at Target to give the house a fresh and bright scent.
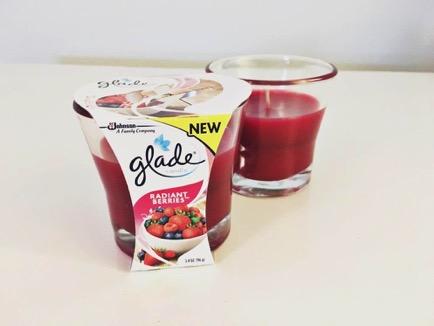
The new Glade® Radiant Berries™ Candles can be found at most major retailers.
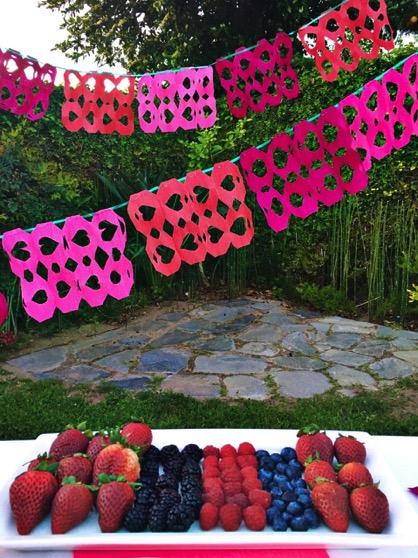
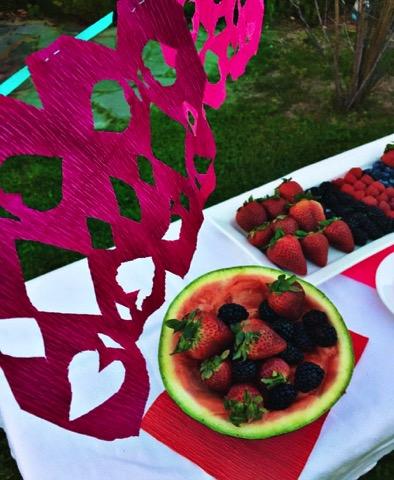
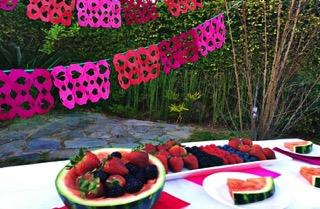
Glade® Radiant Berries™ Candles smell soooo good! They even inspired me to have a backyard berry-themed fruit bar for my boys after a late lunch one afternoon. It was like the scent of the candles suddenly released a bright energy into our house!
I kid you not, with the scent going around the house I couldn’t help but make something bright, playful,vivid, full of color and culture. So I thought for a minute and decided to make some papel picado banners to decorate our “berry” yummy backyard fruit bar. The idea was to smell the fragrance of Glade® Radiant Berries™ Candles inside the house and enjoy the fresh fruit outside with a vivid rush of bright and bold Mexican decorations!
Papel Picado is a popular Mexican party decoration. The streamers are made out of tissue paper and hung across rooms, halls and gardens to add color and fun to parties!
Here is a step-by-step tutorial on how to make simple, individual papel picado streamers. I recommend you use crepe paper instead of tissue paper because although tissue paper is easier to handle and cut, crepe paper is more resistant to wind and natural outdoor debris.
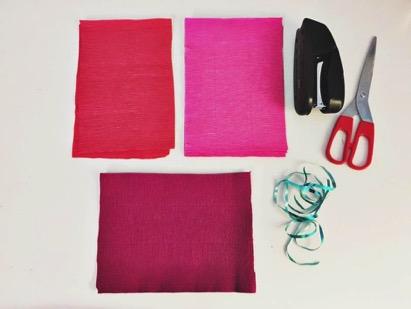
For this project you will need: scissors, string, a stapler and the crepe paper cut into 6” x 8” rectangles. Make sure you cut plenty of crepe paper rectangles for longer streamers. Oh yeah, and have the scent of Glade® Radiant Berries™ Candles in the background and you will also feel that bright energy and use bright pink and red colored crepe paper!


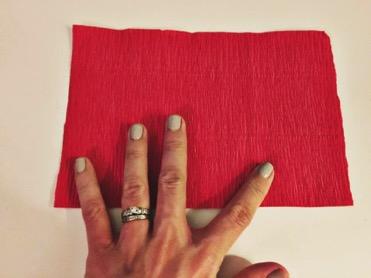
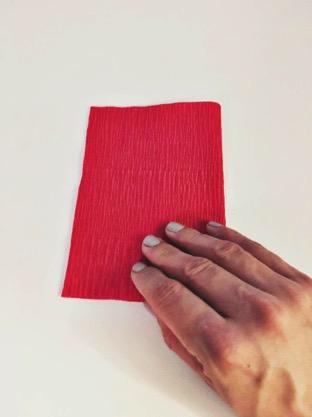
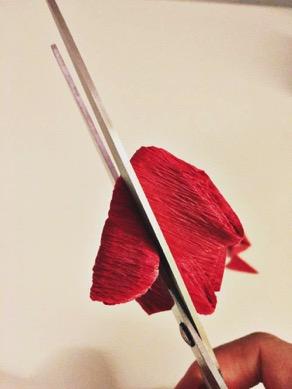
First, you start by folding your rectangle in half. Once folded in half, you fold in half again. Then you grab the ends of the folded rectangle and fold those in half. You will end up with what seems like a small 2” rectangle.

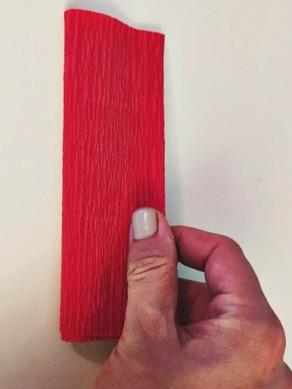
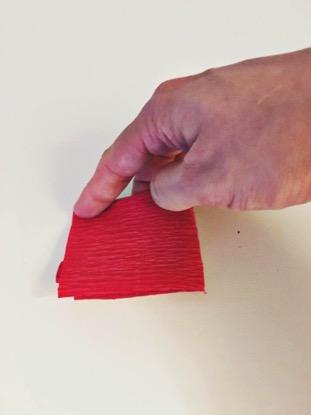
At that point, cut the corners off and your folded rectangle will take the shape of an elongated octagon. On the part of this octagon where the edge is folded, cut a small triangle.


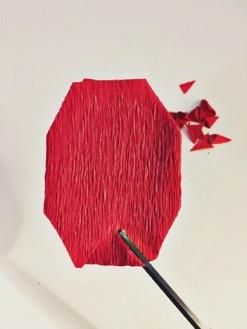
Once the triangle is cut, the top of your folded piece of paper will look like two pointy animal ears. Fold that once again so that the peaks meet the edge of the shape.
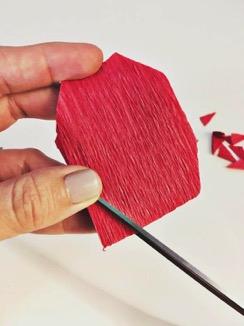
On the folded side of this smaller shape, cut out half of a heart shape. In the small areas above and below your heart cutout, use the scissors carefully to cut tiny little triangles.
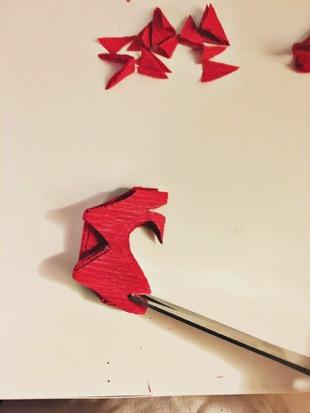
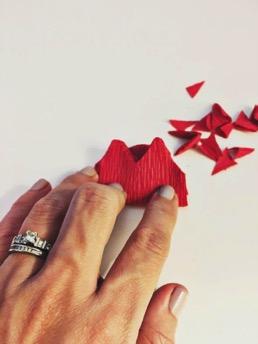
Once that’s done, you can start unfolding your rectangle until it’s fully laid out.
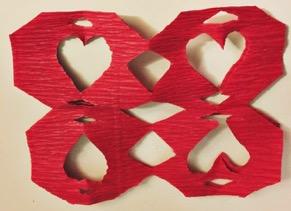
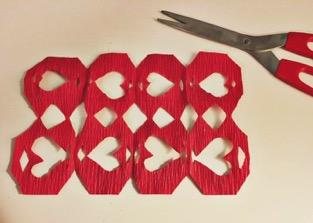
You repeat this process until you have enough rectangles to complete a banner with the length of your choice. In order to string the papel picado rectangles, you simply place the string over the top edge of each piece and staple it in place!
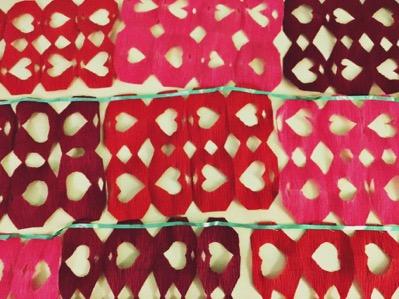
These are not the most elaborate papel picado streamers but they’re fairly easy to make and they sure add bright and playful energy to any festive set-up!
How do you turn family nights into fun, colorful memories? Please share!
Also, make sure to visit the Glade® Facebook page for more information on the different Glade® Radiant Berries™ products available!
Feel Bright. Feel Glade®
Thanks for reading!


En español
Con la primavera en su mero apogeo, me encanta pasar el rato en el jardín y disfrutar del clima, las plantas y la comodidad de estar en casa!
Si ha estado leyendo mi blog, sabrá que me encantan las artesanías y a mi familia le encanta las celebraciones: los días feriados, los cumpleaños, ocasiones especiales y las estaciones del año!
Esta primavera ha sido particularmente especial porque nuestra familia ha crecido y he pasado mucho tiempo en casa! He cambiado varios elementos decorativos alrededor de la casa y compré las nuevas velas con fragancia  Glade® Radiant Berries™ en Target para darle a la casa un nuevo aroma.
¡El olor de las Glade® Radiant Berries™ Candles es riquísimo! Incluso me inspiró a coordinar una pequeña barra de frutas para mis hijos y mi esposo después de la comida. Fue como si el aroma de las velas de repente lanzó una enorme dosis de pasión y energía en la casa.
No les exagero, con el aroma por toda la casa, no pude evitar el deseo de hacer algo divertido, lleno de color y cultura. Así que pensé por un momento y decidí hacer pancartas de papel picado para decorar nuestra barrita de frutas en el jardín. La idea era oler la fragancia de Glade® Radiant Berries™ dentro de la casa y disfrutar de la fruta fresca afuera con detalles coloridos que representaran nuestra cultura! 

El papel picado es una decoración popular mexicana. Las banderitas están hechas de papel chino y se cuelgan a través de las habitaciones, salones y jardines para añadir pasíon, color y diversión a las fiestas.
Aquí les comparto un tutorial sobre cómo hacer serpentinas individuales y sencillas de papel picado. Les recomiendo que usen papel crepé en lugar de papel chino ya que si bien el papel chino es más fácil de manejar y cortar, el papel crepé es más resistente al viento y las condiciones del aire libre.
Para este proyecto se necesita: tijeras, listón, una grapadora y el papel crepé cortado en rectángulos de 6 "x 8" pulgadas. Asegúrese de cortar suficientes rectángulos de papel crepé para lograr serpentinas largas. Ah, , se me olvidaba comentar que si tienen el aroma de Glade® Radiant Berries™ de fondo, tal vez también sientan esa energia y opten por usar papel crepé de tonos rosa y rojo brillante para evocar pasión.
Para comenzar, se empieza doblando el rectángulo por la mitad. Una vez doblado por la mitad, se dobla por la mitad otra vez. A continuación, tome los extremos del rectángulo doblado y los pliegues y doble por la mitad. Va a terminar con lo que parece ser un pequeño rectángulo.
En ese punto, corten las esquinas y su rectángulo doblado tomará la forma de un octágono alargado. En la parte de este octógono, donde se dobla el borde, cortar un pequeño triángulo.
Una vez que se corta el triángulo, la parte superior de la hoja de papel doblado se verá como dos orejitas puntiagudas. Doblar una vez más de modo que los picos se reúnan con el borde de la pieza.
En la parte doblada de esta figura más pequeña, cortar la mitad de un corazón. En las pequeñas áreas por encima y por debajo de su recorte del corazón, usar las tijeras para cortar cuidadosamente diminutos triángulos.
Una vez hecho esto, puede comenzar a desplegar su rectángulo hasta que esté totalmente distribuido.
Puede repetir este proceso hasta que haya suficientes rectángulos para completar una pancarta con la longitud que usted desee. Con el fin de completar una cadena de los rectángulos de papel picado, basta con colocar el listón sobre el borde superior de cada pieza y engrapar para que todo quede en su lugar y esté listo para colgarse!
Estan no son las serpentinas de papel picado más elaboradas, pero son bastante fáciles de hacer y seguro que le añaden una energiá refrescante y un toque de pasión a cualquier festejo!
¿Ustedes cómo convierten noches de familia en recuerdos coloridos y divertidos? ¡Por favor compartan!
Además, asegúrense de visitar la página de Facebook Glade® para más información sobre los diferentes productos del aroma Glade® Radiant Berries™
Siente Pasión. Siente Glade®


¡Gracias por leer!

Sunday, May 8, 2016

A Fun Way to Make Lucky Charm "Donuts"!

This is a compensated post. All opinions are my own. #HoneyNutCheerios #NuestroCereal 


My son Benny is doing well in Preschool but there's one thing he hasn't fully grasped-- colors. He can easily identify red, blue, yellow and green, which happens to be his favorite color, but he sometimes confuses the rest. 


I'm not too concerned but I do like to create activities around the house that emphasize colors.
Recently, I focused this effort with a crisp new Family Size box of Lucky Charms (available at Walmart in the cereal aisle).
I set up small bowls and created color labels so he could dig through the cereal and find the different colored cereal charms and place them in the corresponding bowls. 


If he named and placed the correct colors five times in a row, he was allowed to eat one marshmallow charm.
It turned out to be a super fun mommy & son activity! 


Then we went inside for dinner.
After our meal, Benny asked for a bowl of Lucky Charms and a donut.
I thought about it for a minute, then I decided to make it happen for my son! 
I did so by creating some "pretend donuts" with three ingredients and our Lucky Charms.
This recipe is extremely simple and way more delicious than I would have ever imagined. It's a great evening/morning snack and offers a new way of enjoying your favorite Big G cereal!


To make these Lucky Charm donuts you'll need:
*Whole grain bread
*Cream cheese
*Lucky Charms
*Food Coloring


Directions:
Start by cutting out circles from as many slices of bread as you plan on turning into "donuts".
I used one of those big red cups to basically punch out the shape. 

Then find a smaller round item, to cut out the center of your original circle, which will give the round slice of bread an official donut shape.


Heat up some cream cheese (about 15 seconds in the microwave) to make it soft enough to spread easily and smoothly. It's also important to make the cream cheese soft so it's easy to stir the food coloring and mix well.
Separate the cream cheese into different containers to create different "donut frosting" colors. You basically add different food colors to each bowl. Usually one or two drops of food coloring is enough to create a rich color.
Spread the colored cream cheese on the cutout bread slices.
Decorate with Lucky Charms & Sprinkles... (This was Benny's favorite part)


Enjoy!
Make sure you check out other awesome cereal recipes on Pinterest.
And for additional yummy ideas and inspiration, visit Quericavida.com
Happy Sunday to all!


En español


A mi hijo Benny le va muy bien en la escuelita, pero hay una cosa que no ha logrado al cien por ciento: la identificación de los colores. Reconoce el rojo, azul, amarillo y verde, pero a veces se confunde con el resto de los colores.
No estoy muy preocupada pero sí hago lo posible por crear actividades en casa que enfaticen el aprendizaje de los colores. Recientemente, enfoqué este esfuerzo con una caja de cereal “Lucky Charms”.
Hice etiquetas de distintos colores y las puse frente a varios platitos para que Benny sacara las piezas de cereal y las colocara en los recipientes correspondientes. Cada que nombraba y colocaba los colores correctamente cinco veces seguidas, se le permitía comer una pieza de cereal.
Resultó ser una activada súper divertida.
Luego entramos a la casa a cenar y después de la cena Benny pidió un plato de Lucky Charms y una dona.
Pensé durante un minuto y se me ocurrió una idea.
¡Me puse a hacer “donas” pero con tres ingredientes y el cereal Lucky Charms!


Esta receta es muy sencilla y más deliciosa de lo que hubiera imaginado. ¡Es una buena merienda y permite disfrutar de su cereal favorito de la marca Big G!
Para hacer estas “donas” necesitará lo siguiente:* Pan integral de grano entero*Queso crema*Cereal Lucky Charms*Colorante alimenticio
Instrucciones:Comience por cortar círculos de las rebanadas de pan que planee convertir en "donas".Yo utilicé uno de esos vasos rojos de plástico que seguramente han utilizado en algún momento, para perforar la forma de circulo de la rebanada de pan.A continuación, busque un elemento circular más pequeño para cortar otro círculo del centro y darle la forma de rosquilla.Caliente un poco de queso crema (aproximadamente 15 segundos en el microondas) para que sea lo suficientemente suave y se pueda untar fácilmente y sin problemas. También es importante hacer la crema de queso suave para mezclar los colorantes.Separar la crema de queso en diferentes contenedores para crear diferentes colores de “glaseado”. Por lo general, una o dos gotas de colorante de alimentos es suficiente para crear un color agradable.Difundir la crema de queso de distintos colores sobre las rebanadas de pan.Decorar con Lucky Charms y granas ... (Esta fue la parte favorita de Benny)
¡Disfrute!

Asegúrese de echarle un vistazo a otras recetas de cereales impresionantes en Pinterest. Y para más ideas e inspiración, visite Quericavida.com
¡Feliz domingo a todos!


Sunday, May 1, 2016

Cuteness & Cultura -- Baby Gifts That Embrace Latino Culture


I didn't have a baby shower for Toby.
Early in my pregnancy, I told my mom and sisters that I didn't think one would be necessary because I kept all of my first son Benny's baby clothes, accessories and nursery furniture.
Imagine this: I had two baby showers for Benny,  I received tons of gifts and even then, I still splurged on baby stuff for him. There are outfits, shoes and toys that Benny outgrew before getting the chance to use them! Having a baby shower for my second boy would've been excessive.
Nevertheless, I did want Toby to have a few items intended just for him, so I focused on purchasing gifts that highlight our Mexican Culture. With Cinco de Mayo right around the corner, I thought it  made sense to bring them out and share. 


Here's my little Toby boy sleeping comfortably... sigh. i love my chiquito.

There are A LOT cute items out there and I'm sure there are plenty of vendors whose culturally-influenced baby products I haven't had the chance to explore but here are eight of my favorite things for bebé. These things are cute, affordable and have cultura written all over them:


1. Lil' Libros
This awesome collection of children's books is designed to make your baby familiar with popular Mexican themes  and characters, like Frida Kahlo, Emiliano Zapata and Virgen de Guadalupe, among others. The text is simple enough to engage younger audiences and the illustrations are so dynamic they give parents the opportunity to offer visual explanations for the older kids. Best of all, they were created by two LA-based mommies who are currently working on adding to the collection with upcoming titles, including "Cuahtemoc" and "Un Elefante"... I can't wait!


2. Guayababy 
I saw this Guayabera onesie and my heart skipped a beat! How charming is this clothing item for wee little cuties? It's available on Mexico-Collective.com, with various colors available in sizes 6 - 24 months. And in case you want one for your chiquito too, you'll be glad to know certain colors are on sale!
The Guayababy is just one of many unique products sold online by the creative husband and wife duo that is Robby and Samantha Vient. Their company bio says their "curiosidades y chingaderas range from humorous veladoras...to an array of irreverent Taco-Tee's..." So have your credit card handy cause you'll wanna buy everything!


3. "Fuchi Face" Onesie
Now here's something that cleverly highlights that line your mother repeated whenever you gave her a look of disapproval. "No hagas cara de fuchi," is what my mom would tell me when I didn't want to eat her Lima bean soup (sopa de habas).  This "Fuchi Face" onesie sold by Ellie Elote was way too reminiscent of my childhood to pass up. Now I'll just wait for Toby to get a little older and have my phone nearby to snap the perfect fuchi face photo in his perfect Fuchi Face onesie...yay! 


4. "Dreaming of Tacos" beanie
How can I explain the coolness of having a tiny taco beanie on my baby's head!? He doesn't eat solids yet but I can arrange to eat tacos on his behalf when he wears it. Seriously though, I found this beanie on Etsy. It accurately describes what my son will probably be dreaming about in three years or so... TACOS! The design is a creation of LeftRight, which has a variety of other styles designed for babies who want to make a statement. This one makes Toby's little head a few notches cuter, doesn't it? And it makes mommy's belly a few notches hungrier and ready to ask the taco man: "Deme tres de al pastor!" 


5. Sarape Bib
There is nothing more colorfully reminiscent of Mexico than a bright & loud Zarape. So when I saw it as a bib, I made the executive decision that it was exactly what we needed for Baby Toby before he gets his first taste of Fideo while I play 'El Son de la Negra' to my baby boy.... (If you don't know it, Google search the song and you'll get me). This bib was also an Etsy find. The shop that sells it, Finney, also has teethers, blankets and an array of cute things for babies, but nothing quite as colorful as this bib! 


6. Uncle Goose's Spanish Wooden Blocks
Here's a great take on the classic children's toy-- a classic children's toy en español. These neat wooden blocks made in the US from fast-growing sustainable basswood are also printed with child safe non-toxic ink. What's more is that they weren't kidding about getting the Spanish alphabet right-- I was ecstatic when I found the "Ñ" and all the accent marks in the right places. What a great way to start your kiddos on that bilingual tip at an early age... And they come in an adorable brown box perfect for storing. The blocks are also available in several other languages. 


7. Baby Poncho/Jorongo
What better way to cover up my baby when he's cold!?!
Any time a blanket seems too cumbersome, it's baby Jorongo to the rescue! This is the tiniest little Jorongo that I ever did see (often confused with a poncho, which is similar but a Poncho is traditionally from South America whereas a Jorongo is exclusively from Mexico). This was another Etsy find. It arrived from LoveSofiaShop based in Texas and its cute enough to literally make a mother go gaga over it. The slit is big enough to fit any baby's head. True story: the first time I put it on Toby, my husband Paul got the itch to wear one too. He wanted a picture of father and son twinning...Lol. There are several colors available.... You're welcome ;-)


8. Lucha Libre plush
This may very well become Toby's favorite toy. The little stuffed Mexican wrestler is soft, cute and handmade (a stark contrast to the real luchadores but that's ok). Its button eyes are adorable and the shoes with yarn laces are sooo cute! It's a necessary gift for your baby if you grew up hearing about "El Santo" and "El Demonio Azul" or if you simply love the concept of men in masks kicking each other's butts, inside a ring, in Mexico. The girl who makes these also makes fun greeting cards and sells her stuff on Etsy.
And now to watch the most adorable wrestling match between Toby and his plush! 


Thanks for reading. Hope you consider supporting these cool vendors...AND please, by all means, leave a comment with other suggestions!
Hasta pronto and Happy Cinco de Mayo

Note: I did not receive compensation for writing about these items.